OpenPGP Smartcards and GNOME

The combination of GnuPG and a OpenPGP smartcard has been implemented and working for almost a decade. I recall starting to use it when I received a FSFE Fellowship card in 2006. Today I’m using a YubiKey NEO. Sadly there has been some regressions when using them under GNOME recently. I reinstalled my laptop with Debian Jessie (beta2) recently, and now took the time to work through the issue and write down a workaround.

To work with GnuPG and smartcards you install GnuPG agent, scdaemon, pscsd and pcsc-tools. On Debian you can do it like this:

apt-get install gnupg-agent scdaemon pcscd pcsc-tools

Use the pcsc_scan command line tool to make sure pcscd recognize the smartcard before continuing, if that doesn’t recognize the smartcard nothing beyond this point will work. The next step is to make sure you have the following line in ~/.gnupg/gpg.conf:

use-agent

Logging out and into GNOME should start gpg-agent for you, through the /etc/X11/Xsession.d/90gpg-agent script. In theory, this should be all that is required. However, when you start a terminal and attempt to use the smartcard through GnuPG you would get an error like this:

jas@latte:~$ gpg --card-status
gpg: selecting openpgp failed: unknown command
gpg: OpenPGP card not available: general error
jas@latte:~$

The reason is that the GNOME Keyring hijacks the GnuPG agent’s environment variables and effectively replaces gpg-agent with gnome-keyring-daemon which does not support smartcard commands (Debian bug #773304). GnuPG uses the environment variable GPG_AGENT_INFO to find the location of the agent socket, and when the GNOME Keyring is active it will typically look like this:

jas@latte:~$ echo $GPG_AGENT_INFO 
/run/user/1000/keyring/gpg:0:1
jas@latte:~$ 

If you use GnuPG with a smartcard, I recommend to disable GNOME Keyring’s GnuPG and SSH agent emulation code. This used to be easy to achieve in older GNOME releases (e.g., the one included in Debian Wheezy), through the gnome-session-properties GUI. Sadly there is no longer any GUI for disabling this functionality (Debian bug #760102). The GNOME Keyring GnuPG/SSH agent replacement functionality is invoked through the XDG autostart mechanism, and the documented way to disable system-wide services for a normal user account is to invoke the following commands.

jas@latte:~$ mkdir ~/.config/autostart
jas@latte:~$ cp /etc/xdg/autostart/gnome-keyring-gpg.desktop ~/.config/autostart/
jas@latte:~$ echo 'Hidden=true' >> ~/.config/autostart/gnome-keyring-gpg.desktop 
jas@latte:~$ cp /etc/xdg/autostart/gnome-keyring-ssh.desktop ~/.config/autostart/
jas@latte:~$ echo 'Hidden=true' >> ~/.config/autostart/gnome-keyring-ssh.desktop 
jas@latte:~$ 

You now need to logout and login again. When you start a terminal, you can look at the GPG_AGENT_INFO environment variable again and everything should be working again.

jas@latte:~$ echo $GPG_AGENT_INFO 
/tmp/gpg-dqR4L7/S.gpg-agent:1890:1
jas@latte:~$ echo $SSH_AUTH_SOCK 
/tmp/gpg-54VfLs/S.gpg-agent.ssh
jas@latte:~$ gpg --card-status
Application ID ...: D2760001240102000060000000420000
...
jas@latte:~$ ssh-add -L
ssh-rsa AAAAB3NzaC1yc2EAAAADAQABAAABAQDFP+UOTZJ+OXydpmbKmdGOVoJJz8se7lMs139T+TNLryk3EEWF+GqbB4VgzxzrGjwAMSjeQkAMb7Sbn+VpbJf1JDPFBHoYJQmg6CX4kFRaGZT6DHbYjgia59WkdkEYTtB7KPkbFWleo/RZT2u3f8eTedrP7dhSX0azN0lDuu/wBrwedzSV+AiPr10rQaCTp1V8sKbhz5ryOXHQW0Gcps6JraRzMW+ooKFX3lPq0pZa7qL9F6sE4sDFvtOdbRJoZS1b88aZrENGx8KSrcMzARq9UBn1plsEG4/3BRv/BgHHaF+d97by52R0VVyIXpLlkdp1Uk4D9cQptgaH4UAyI1vr cardno:006000000042
jas@latte:~$ 

That’s it. Resolving this properly involves 1) adding smartcard code to the GNOME Keyring, 2) disabling the GnuPG/SSH replacement code in GNOME Keyring completely, 3) reorder the startup so that gpg-agent supersedes gnome-keyring-daemon instead of vice versa, so that people who installed the gpg-agent really gets it instead of the GNOME default, or 4) something else. I don’t have a strong opinion on how to solve this, but 3) sounds like a simple way forward.

Offline GnuPG Master Key and Subkeys on YubiKey NEO Smartcard

I have moved to a new OpenPGP key. There are many tutorials and blog posts on GnuPG key generation around, but none of them matched exactly the setup I wanted to have. So I wrote down the steps I took, to remember them if I need to in the future. Briefly my requirements were as follows:

  • The new master GnuPG key is on an USB stick.
  • The USB stick is only ever used on an offline computer.
  • There are subkeys stored on a YubiKey NEO smartcard for daily use.
  • I want to generate the subkeys using GnuPG so I have a backup.
  • Some non-default hash/cipher preferences encoded into the public key.

Continue reading Offline GnuPG Master Key and Subkeys on YubiKey NEO Smartcard

OpenPGP Key Transition Statement

I have created a new OpenPGP key 54265e8c and will be transitioning away from my old key. If you have signed my old key, I would appreciate signatures on my new key as well. I have created a transition statement that can be downloaded from https://josefsson.org/key-transition-2014-06-22.txt.

Below is the signed statement.

-----BEGIN PGP SIGNED MESSAGE-----
Hash: SHA512

OpenPGP Key Transition Statement for Simon Josefsson

I have created a new OpenPGP key and will be transitioning away from
my old key.  The old key has not been compromised and will continue to
be valid for some time, but I prefer all future correspondence to be
encrypted to the new key, and will be making signatures with the new
key going forward.

I would like this new key to be re-integrated into the web of trust.
This message is signed by both keys to certify the transition.  My new
and old keys are signed by each other.  If you have signed my old key,
I would appreciate signatures on my new key as well, provided that
your signing policy permits that without re-authenticating me.

The old key, which I am transitioning away from, is:

pub   1280R/B565716F 2002-05-05
      Key fingerprint = 0424 D4EE 81A0 E3D1 19C6  F835 EDA2 1E94 B565 716F

The new key, to which I am transitioning, is:

pub   3744R/54265E8C 2014-06-22
      Key fingerprint = 9AA9 BDB1 1BB1 B99A 2128  5A33 0664 A769 5426 5E8C

The entire key may be downloaded from: https://josefsson.org/54265e8c.txt

To fetch the full new key from a public key server using GnuPG, run:

  gpg --keyserver keys.gnupg.net --recv-key 54265e8c

If you already know my old key, you can now verify that the new key is
signed by the old one:

  gpg --check-sigs 54265e8c

If you are satisfied that you've got the right key, and the User IDs
match what you expect, I would appreciate it if you would sign my key:

  gpg --sign-key 54265e8c

You can upload your signatures to a public keyserver directly:

  gpg --keyserver keys.gnupg.net --send-key 54265e8c

Or email simon@josefsson.org (possibly encrypted) the output from:

  gpg --armor --export 54265e8c

If you'd like any further verification or have any questions about the
transition please contact me directly.

To verify the integrity of this statement:

  wget -q -O- https://josefsson.org/key-transition-2014-06-22.txt|gpg --verify

/Simon
-----BEGIN PGP SIGNATURE-----
Version: GnuPG v1.4.12 (GNU/Linux)

iLwEAQEKAAYFAlOnV+AACgkQ7aIelLVlcW89XgUAljJgYfReyR9/bU+Om6UHUttt
CAOgSRqdcQSQ2hT69vzuhb/bc8CslIQcBtGqTgxDFsxEFhbm5zKn+tSzy5MHNHqt
MsqHcZjlYuYVhMXDhka+cfyhtd9zIxjVE5vk8v+GqEGoh8DGYq0vPy3VfvcSz5Z3
MSUpSj8gN00jlU1z4nad3maEq0ApvsLr8EsLZmtxF5TNFvzJ8mmwY+gHBGHjVYkB
8AQBAQoABgUCU6dX4AAKCRAGZKdpVCZejD1eDp46XGL2puMp0le2OF75WIUW8xqf
TMiZeB99ruk3P/jvuLnGPP2J5o7SIKE50FkMEss0yvxi6jBlHk+cJeKWGXVjBpxU
0QHq063NU+kjbMYwDfi5ZxXqaKeYODJm8Xmfh3d7lRaWF5rUOosR8nC/OROSrhg4
TjlAbvbxpQsls/JPbbporK2gbAtMlzJPD8zC8z/dT+t0qjlce8fADugblVW3bACC
Kl53X4XpojzNd/U19tSXkIBdNY/GVJqci+iruiJ1WGARF9ocnIXVuNXsfyt7UGq4
UiM/AeDVzI76v1QnE8WpsmSXzi2zXe3VahUPhOU2nPDoL53ggiVsTY3TwilvQLfX
Av/74PIaEtCi1g23YeojQlpdYzcWfnE+tUyTSNwPIBzyzHvFAHNg1Pg0KKUALsD9
P7EjrMuz63z2276EBKX8++9GnQQNCNfdHSuX4WGrBx2YgmOOqRdllMKz6pVMZdJO
V+gXbCMx0D5G7v50oB58Mb5NOgIoOnh3IQhJ7LkLwmcdG39yCdpU+92XbAW73elV
kmM8i0wsj5kDUU2ys32Gj2HnsVpbnh3Fvm9fjFJRbbQL/FxNAjzNcHe4cF3g8hTb
YVJJlzhmHGvd7HvXysJJaa0=
=ZaqY
-----END PGP SIGNATURE-----

Creating a small JPEG photo for your OpenPGP key

I’m in the process of moving to a new OpenPGP key, and I want to include a small JPEG image of myself in it. The OpenPGP specification describes, in section 5.12.1 of RFC 4880, how an OpenPGP packet can contain an JPEG image. Unfortunately the document does not require or suggest any properties of images, nor does it warn about excessively large images. The GnuPG manual helpfully asserts that “Note that a very large JPEG will make for a very large key.”.

Researching this further, it seems that proprietary PGP program suggests 120×144 as the maximum size, although I haven’t found an authoritative source of that information. Looking at the GnuPG code, you can see that it suggests around 240×288 in a string saying “Keeping the image close to 240×288 is a good size to use”. Further, there is a warning displayed if the image is above 6144 bytes saying that “This JPEG is really large”.

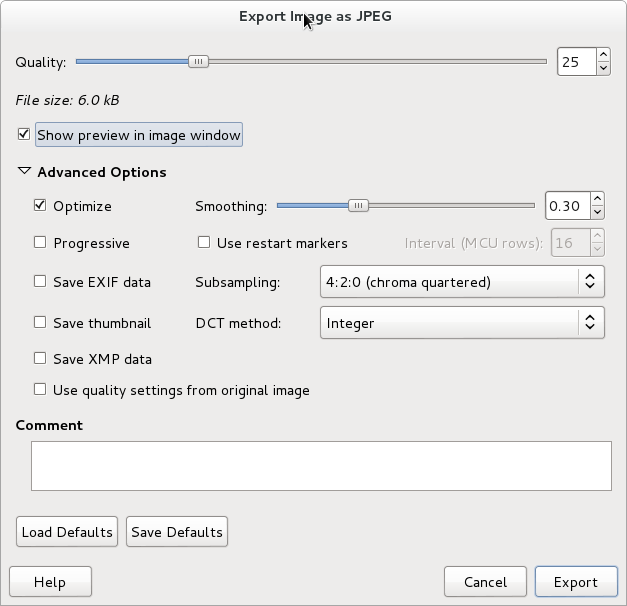
I think the 6kb warning point is on the low side today, however without any more researched recommendation of image size, I’m inclined to go for a 6kb 240×288 image. Achieving this was not trivial, I ended up using GIMP to crop an image, resize it to 240×288, and then export it to JPEG. Chosing the relevant parameters during export is the tricky part. First, make sure to select ‘Show preview in image window’ so that you get a file size estimate and a preview of how the photo will look. I found the following settings useful for reducing size:

  • Disable “Save EXIF data”
  • Disable “Save thumbnail”
  • Disable “Save XMP data”
  • Change “Subsampling” from the default “4:4:4 (best quality)” to “4:2:0 (chroma quartered)”.
  • Try enabling only one of “Optimize” and “Progressive”. Sometimes I get best results disabling one and keeping the other enabled, and sometimes the other way around. I have not seen smaller size with both enabled, nor with both disabled.
  • Smooth the picture a bit to reduce pixel effects and size.
  • Change quality setting, I had to reduce it to around 25%.

See screenshot below of the settings windows.

GnuPG photo GIMP settings window

Eventually, I managed to get a photo that I was reasonable happy with. It is 240×288 and is 6048 bytes large.

GnuPG photo for Simon

If anyone has further information, or opinions, on what image sizes makes sense for OpenPGP photos, let me know. Ideas on how to reduce size of JPEG images further without reducing quality as much would be welcome.

Replicant 4.2 on Samsung S3

Since November 2013 I have been using Replicant on my Samsung S3 as an alternative OS. The experience has been good for everyday use. The limits (due to non-free software components) compared to a “normal” S3 (running vendor ROM or CyanogenMod) is lack of GPS/wifi/bluetooth/NFC/frontcamera functionality — although it is easy to get some of that working again, including GPS, which is nice for my geocaching hobby. The Replicant software is stable for being an Android platform; better than my Nexus 7 (2nd generation) tablet which I got around the same time that runs an unmodified version of Android. The S3 has crashed around ten times in these four months. I’ve lost track of the number of N7 crashes, especially after the upgrade to Android 4.4. I use the N7 significantly less than the S3, reinforcing my impression that Replicant is a stable Android. I have not had any other problem that I couldn’t explain, and have rarely had to reboot the device.

The Replicant project recently released version 4.2 and while I don’t expect the release to resolve any problem for me, I decided it was time to upgrade and learn something new. I initially tried the official ROM images, and later migrated to using my own build of the software (for no particular reason other than that I could).

Before the installation, I wanted to have a full backup of the phone to avoid losing data. I use SMS Backup+ to keep a backup of my call log, SMS and MMS on my own IMAP server. I use oandbackup to take a backup of all software and settings on the phone. I use DAVDroid for my contacts and calendar (using a Radicale server), and reluctantly still use aCal in order to access my Google Calendar (because Google does not implement RFC 5397 properly so it doesn’t work with DAVDroid). Alas all that software is not sufficient for backup purposes, for example photos are still not copied elsewhere. In order to have a complete backup of the phone, I’m using rsync over the android debug bridge (adb). More precisely, I connect the phone using a USB cable, push a rsyncd configuration file, start the rsync daemon on the phone, forward the TCP/IP port, and then launch rsync locally. The following commands are used:

jas@latte:~$ cat rsyncd.conf
address 127.0.0.1
uid = root
gid = root
[root]
path = /
jas@latte:~$ adb push rsyncd.conf /extSdCard/rsyncd.conf
* daemon not running. starting it now on port 5037 *
* daemon started successfully *
0 KB/s (57 bytes in 0.059s)
jas@latte:~$ adb root
jas@latte:~$ adb shell rsync --daemon --no-detach --config=/extSdCard/rsyncd.conf &
jas@latte:~$ adb forward tcp:6010 tcp:873
jas@latte:~$ sudo rsync -av --delete --exclude /dev --exclude /acct --exclude /sys --exclude /proc rsync://localhost:6010/root/ /root/s3-bup/
...

Now feeling safe that I would not lose any data, I remove the SIM card from my phone (to avoid having calls, SMS or cell data interrupt during the installation) and follow the Replicant Samsung S3 installation documentation. Installation was straightforward. I booted up the newly installed ROM and familiarized myself with it. My first reaction was that the graphics felt a bit slower compared to Replicant 4.0, but it is hard to tell for certain.

After installation, I took a quick rsync backup of the freshly installed phone, to have a starting point for future backups. Since my IMAP and CardDav/CalDav servers use certificates signed by CACert I first had to install the CACert trust anchors, to get SMS Backup+ and DAVDroid to connect. For some reason it was not sufficient to add only the root CACert certificate, so I had to add the intermediate CA cert as well. To load the certs, I invoke the following commands, selecting ‘Install from SD Card’ when the menu is invoked (twice).

adb push root.crt /sdcard/
adb shell am start -n "com.android.settings/.Settings\"\$\"SecuritySettingsActivity"
adb push class3.crt /sdcard/
adb shell am start -n "com.android.settings/.Settings\"\$\"SecuritySettingsActivity"

I restore apps with oandbackup, and I select a set of important apps that I want restored with settings preserved, including aCal, K9, Xabber, c:geo, OsmAnd~, NewsBlur, Google Authenticator. I install SMS Backup+ from FDroid separately and configure it, SMS Backup+ doesn’t seem to want to restore anything if the app was restored with settings using oandbackup. I install and configure the DAVdroid account with the server URL, and watch it populate my address book and calendar with information.

After organizing the icons on the launcher screen, and changing the wallpaper, I’m up and running with Replicant 4.2. This upgrade effort took me around two evenings to complete, with around half of the time consumed by exploring different ways to do the rsync backup before I settled on the rsync daemon approach. Compared to the last time, when I spent almost two weeks researching various options and preparing for the install, this felt like a swift process.

Continue reading Replicant 4.2 on Samsung S3